
Step 1: Design and Engineering
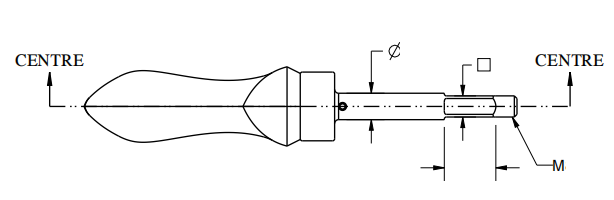
- Create a Detailed 3D Model: Use CAD software to design the door handle, ensuring all dimensions, tolerances, and surface finishes are specified.
- Consider Casting Requirements: Account for shrinkage, draft angles, and machining allowances in the design to ensure the final product meets specifications.
- Simulate the Casting Process: Use simulation software to identify potential defects like porosity or warping and optimize the design accordingly.
Step 2: Material Selection
- Choose the Right Steel Alloy: Select a steel alloy that meets the mechanical and aesthetic properties required for the door handle (e.g., stainless steel for corrosion resistance and a polished finish).
- Verify Material Compatibility: Ensure the chosen alloy is suitable for precision casting and can withstand the intended operating conditions.
Step 3: Pattern and Mold Preparation
- Create a Wax or 3D-Printed Pattern: Produce a precise pattern of the door handle using wax or a 3D printer.
- Assemble the Pattern Tree: Attach the pattern to a central wax sprue to form a tree-like structure, allowing multiple handles to be cast simultaneously.
- Apply Ceramic Coating: Dip the pattern tree into a ceramic slurry and coat it with refractory sand to create a ceramic shell. Repeat this process to build a thick, durable shell.
- Dry and Cure the Mold: Allow the ceramic shell to dry and harden completely.
Step 4: Dewaxing and Preheating
- Remove the Wax Pattern: Heat the mold to melt and remove the wax, leaving a hollow cavity in the shape of the door handle.
- Preheat the Mold: Fire the ceramic mold in a furnace to strengthen it and prepare it for the molten steel.
Step 5: Casting Process
- Melt the Steel: Heat the selected steel alloy in a furnace until it reaches the desired pouring temperature.
- Pour the Molten Steel: Carefully pour the molten steel into the preheated ceramic mold, ensuring it fills the cavity completely.
- Allow Cooling: Let the mold cool slowly to prevent cracking or internal stresses in the casting.
Step 6: Post-Casting Operations
- Remove the Ceramic Shell: Break away the ceramic mold to reveal the raw casting.
- Cut and Separate: Remove the individual door handles from the pattern tree using cutting tools.
- Perform Finishing Operations: Clean, grind, and polish the handles to achieve the desired surface finish and dimensional accuracy.
- Inspect the Castings: Use non-destructive testing methods (e.g., X-ray, ultrasonic testing) to ensure the handles are free of defects.
Step 7: Heat Treatment and Machining
- Apply Heat Treatment: If required, heat-treat the handles to enhance their mechanical properties.
- Machine Critical Features: Perform final machining operations to achieve tight tolerances and precise geometries.
Conclusion
Preparing for steel precision casting of a door handle involves careful planning, precise design, and meticulous execution. By following these steps, you can ensure the production of high-quality, durable handles that meet the demands of your application. Always collaborate with experienced foundries and engineers to optimize the process and achieve the best results.


